
Hey!
In this post I configure my Raspberry Pi to have a pseudo terminal available over the bluetooth.
Why
As I recently passed OSCP (humble brag), my mindset was focused on pwning stuff. However, I’m not working in offensive side of the cybersecurity so I just let my imagination run wild about red teaming exercises in real life. I came up with an idea of having Kali linux on my Raspberry Pi 3 B+ with the terminal available over blueooth. Go “in the field”, have the RPI running of some powerbank in a backpack and connect to it using a laptop. In case I’m caught, first a kill cord for a laptop should power off the device and Raspberry Pi should be another layer of “obfuscation”. I didn’t cover encryption of Raspberry here because encrypting the disk on a microSD which has very limited write amounts does not make sense for a long term project. Well, this all sounds like a gimmick, doesn’t it? But it didn’t stop me anyway, I wanted to test it :D
How
Kali on RPI
So my plan was pretty simple:
- Have RPI running of a powerbank (in the backpack)
- Communicate over bluetooth using any laptop
- Profit!
Technical aspect
-
Download proper image for your device
First things first, we need an OS. I chose Kali because I already knew it from my preparations to the exam. I’m aware of projects like Parrot Linux and BlackArch Linux and I even am using Parrot for my struggle in HackerOne, but I still prefer Kali.
https://www.offensive-security.com/kali-linux-arm-images/
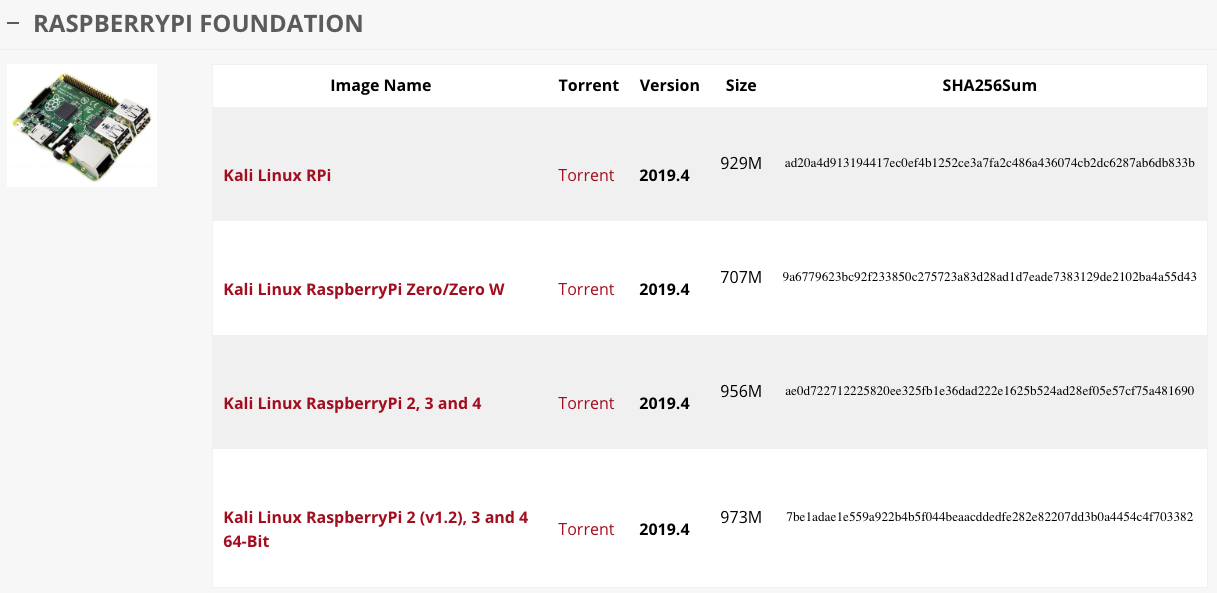
Every good blog has images so here we go. When it comes to the image name, I went with “Kali Linux RaspberryPi 2 (v1.2), 3 and 4 64-Bit “ just because my RPI has 64-bit CPU so why make it suffer running 32-bit OS. Your mileage may vary.
-
Unpack
.xzfileThis is a straight forward step. I found
7zof being very friendly archive app. Not only it supports this weird.xzextension but also classic tarball (.tar) and gzipped tarball (tar.gz). If there is an archive to unpack, I just throw it to7zand it gets the job done.# Unpack 7z x kali-linux-2019.4-rpi3-nexmon.img.xz -
Copy the image to SD card
Did I mention already that I’m following Offensive Security documentation on how to install Kali? Well, I did now. Now you know.
Notice in the the command below that you must point the correct output device (
/dev/sdX, it’s a whole device - not a single partition like/dev/sdX1!). If you only have one disk, I bet the microSD is under/dev/sdbbut make sure to check it using utilities likefdisk. Oh, and of course, I already took my microSD card, put it in the SD adapter and pushed it into SD reader carefully enough to not switch the physical read-only switch on the adapter.# Do the magic (copy) sudo dd if=kali-linux-2019.4-rpi3-nexmon.img.img of=/dev/sdX bs=512k & -
Mount second partition
This is a border for those of you to which mounting a partition is not an easy peasy thing. This suggets that probably you need to gain a little bit of more familiarity with *NIX systems overall.

-
Network interfaces
Make sure
/etc/network/interfacescontains the following:# Very simple config auto eth0 iface eth0 inet dhcpThis way kali will auto-negotiate IP address upon inserting Registered Jack, Type 45 also known as the Ethernet or simply that Internet cable.
-
umountsecond partitionYou know the drill. In case of the target being busy, make sure you
cdout of the mounted directory if you’re still in there. -
Run the RPI and connect an Ethernet cable
So this is a first big moment now (obviously there are others to come, duh). First run of our newly installed Operating System. If you connected the HDMI cable you can observe the rainbow box ..aaaaand first couple of lines starts filling the screen. Voila!
Make sure to connect all the cables so the next step will not become harder than it should be.
-
Find the RPI IP address
Now finally we can sit down and enjoy again the terminal stuff. Whatsmore, we will do mini OSCP excersise -
recoinesanse!Recoinasense? I always get this spelling wrong. Reconnaissance! *Thanks duckduckgo..*# My subnet is 172.20.0.0/24 # I will just use ICMP to check what's on my network # nmap fun nmap -n -sP 172.20.0.0/24 # fping fun fping -a -g 172.20.0.0/24 -
Follow headless installation from Mozilla Hacks
This step has hidden substep meant to be done before doing anything else. Establish secure shell connection with the Raspberry Pi with the default credentials which Kali has. Oh and I would change the password if I were you.
I don’t want to double the information so I’m sending you to the original post for further steps. In short, you set up a bluetooth in raspberry so that upon connection, a pseudo terminal is presented to you. I tried tinkering with it but in the end I just accepted that it will not meet my expectations in terms of the security.
- First of all, this
rfcommis perfoming auto-logon. This was easy to change - just remove-a pifrom theExectStartattribute of[Service]in the/etc/systemd/system/rfcomm.servicefile. -
Second thing, this bluetooth connection seems not encrypted to me and anyone can connect to it. I checked
rfcommmanual and to my surprise, I found these options:-A, --auth Enable authentication -E, --encrypt Enable encryption -S, --secure Secure connectionWow! Such protection! So many to choose from! I enabled them all, what can I say. Here’s what happened:


Spoiler alert: whatever I did, I could not manage to overcome this issue. There is no authentication checkbox or setting which I could enable on the client side. Even on Windows I failed.
In the end, the combination which only worked for me was the standalone switch
-E.
I tried sniffing bluetooth packets using Wireshark but apparently nowadays laptops have chips which do not allow sniffing someone’s else traffic. Unfortunatelly, I don’t have bluetooth dongle lying around. Note to myself: I should buy it one day though. Nevermind, let’s go! Just be aware that anyone can connect to your Raspberry Pi.
- First of all, this
-
Pair with the device
Enable bluetooth in your laptop and pair with the device. Simple as that. No PIN or password of any sort required upon connection which saddens me a bit but what can I say.
-
Spawn a terminal
This is another big moment now. Even though it might not be ideal, it’s still nice to see that it works. Once you are paired with the Raspberry Pi, you should have a socket available to communicate with the RPI.
- On *NIX systems it will be under
/dev/, namely/dev/cu.raspberrypi-SerialPortin my case. I just went withscreen /dev/cu.raspberrypi-SerialPort. - On Windows, serial port should be created and you can find it, for instance, in Device Manger. Once you know the name (let it be
COM3), fire up Putty, changeConnection typeto beSerial, enterCOM3in theSerial linefield and lastly set aSpeed(baud rate) to115200. ClickOpen.
One way or another, you should have terminal available to you. You can configure the height and width (stty rows and cols) or you can leave it for now. If you set the console window right, you can use
tmuxinside and have it all working smoothly. - On *NIX systems it will be under
-
wpa_cli
Okay, but now what? I just unplugged the Ethernet cable and headed to set up a WiFi connection instead. After all, if I ever would like to use such a setup in red teaming scenario, I probably will need WiFi connectivity.
Let’s start with entering WPA command line client
root@kali:~# wpa_cli -i wlan0
wpa_cli v2.9
Copyright (c) 2004-2019, Jouni Malinen <j@w1.fi> and contributors

This software may be distributed under the terms of the BSD license.
See README for more details.


Interactive mode
>
Ok, we’ve got a prompt. Noice. So if you are macOS Catalina user like I am, maybe you noticed that when you click WiFi icon, there are no networks available because it’s scanning. That’s what we’ve got to do.
> scan
OK
<3>CTRL-EVENT-SCAN-STARTED
<3>CTRL-EVENT-SCAN-RESULTS
<3>WPS-AP-AVAILABLE
<3>CTRL-EVENT-NETWORK-NOT-FOUND
<3>CTRL-EVENT-SCAN-STARTED
<3>CTRL-EVENT-SCAN-RESULTS
<3>WPS-AP-AVAILABLE
>
Simple enough, I like it! Let’s see the results. Note: I replaced mac BSSID addresses and network names. I like you Internet but not necessarily want you to locate me in seconds using projects like WiGLE.
> scan_results
bssid / frequency / signal level / flags / ssid
00:00:00:11:22:f6       2437    -46     [WPA2-PSK-CCMP][ESS]    FIRST_WIFI
00:00:00:11:22:35       2412    -88     [WPA-PSK-CCMP+TKIP][WPA2-PSK-CCMP+TKIP][ESS]    SECOND_WIFI
00:00:00:11:22:1c       2452    -90     [WPA2-PSK-CCMP][WPS][ESS]       THIRD_WIFI
00:00:00:11:22:fd       2432    -92     [WPA-PSK-CCMP][WPA2-PSK-CCMP][ESS]      FOURTH_WIFI
00:00:00:11:22:35       2412    -91     [ESS]   FIFTH_WIFI
00:00:00:11:22:08       2412    -96     [ESS]   FIFTH_WIFI
00:00:00:11:22:06       2412    -96     [WPA-PSK-CCMP+TKIP][WPA2-PSK-CCMP+TKIP][WPS][ESS]       SIXTH_WIFI
00:00:00:11:22:1c       2452    -93     [WPA2-PSK-CCMP][ESS]
>
We localized a network (
FOURTH_WIFI) to which I know password, let’s configure the WPA Client to get and connect to it. This process is also straight forward an involves four steps:- Add a new network which we can then configure
- Set a proper SSID for this network
- Set a proper password for this network
- Enable the network
There is great tutorial on this already so in case of problems, probably you will find the answer there.
> add_network 0
0

> set_network 0 ssid "FOURTH_WIFI"
OK

> set_network 0 psk "mysecretpassword"
OK
<3>CTRL-EVENT-SCAN-STARTED
<3>CTRL-EVENT-SCAN-RESULTS
<3>WPS-AP-AVAILABLE

> enable_network 0
OK
<3>CTRL-EVENT-SCAN-STARTED
<3>CTRL-EVENT-SCAN-RESULTS
<3>WPS-AP-AVAILABLE
<3>Trying to associate with SSID 'FOURTH_WIFI'
<3>Associated with 00:00:00:11:22:fd
<3>CTRL-EVENT-SUBNET-STATUS-UPDATE status=0
<3>WPA: Key negotiation completed with 00:00:00:11:22:fd [PTK=CCMP GTK=CCMP]
<3>CTRL-EVENT-CONNECTED - Connection to 00:00:00:11:22:fd completed [id=0 id_str=]
<3>CTRL-EVENT-SCAN-STARTED
<3>CTRL-EVENT-SCAN-RESULTS

>

# 'q' to quit
> q
Okay! So far so good! The very last thing to do is to query DHCP and get some IP address for our RPI.
# Check what's the status of wlan0 device

root@kali:~# ip ad show dev wlan0
3: wlan0: <BROADCAST,MULTICAST,UP,LOWER_UP> mtu 1500 qdisc pfifo_fast state UP group default qlen 1000
    link/ether 00:00:00:11:22:2c brd ff:ff:ff:ff:ff:ff

# Good, it's powered on but no IP address
# Let's grab it from DHCP

root@kali:~# dhclient wlan0

# Check again and..

root@kali:~# ip ad show dev wlan0
3: wlan0: <BROADCAST,MULTICAST,UP,LOWER_UP> mtu 1500 qdisc pfifo_fast state UP group default qlen 1000
    link/ether 00:00:00:11:22:2c brd ff:ff:ff:ff:ff:ff
    inet 172.20.0.115/24 brd 172.20.0.255 scope global dynamic wlan0
       valid_lft 172799sec preferred_lft 172799sec

# ..voila once again!
That’s it! All done.
Worth it?
Actually, it may be a weird behavior of my Raspberry unit but I found this bluetooth channel being very unstable. If I fire up this setup at home with very few WiFi networks and IoT devices talking over bluetooth, it’s actually pretty stable. However, when I was trying to do anything at my work place with dozens of laptops and other bluetooth-speaking devices, I could connect, see the terminal and then it just hung. Sometimes it let me connect once again after about 15 minutes but sometimes I had to restart the Raspberry Pi. So unfortunatelly I don’t think it’s a suitable setup for a wanna-be red teamer.